
ij.start.canon For Canon Printer Setup, Canon USA Inc.
Setup and Connect your Canon Printer, Download Drivers, With ij.start.canon. Connection Guide for you Printer/Scanner.

Get Your Canon Printer live With ij.start.canon
Before interacting with software, your physical hardware must be prepped.
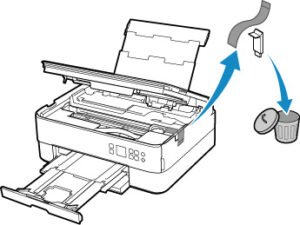
1. Remove Protective Packaging:
Peel away all orange or blue shipping tape and plastic film from the exterior and interior of the printer.
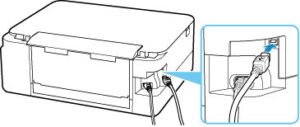
2. Connect to Power:
Plug the supplied power cord into the rear of the printer and into a wall outlet.
3. Power On the Device:
Press the power button and wait approximately 3 to 5 minutes for the initial mechanical boot-up sequence to finish.
4. Install Ink Cartridges:
Open the cartridge access door. Wait for the carriage to slide into view, then click your included ink or toner cartridges firmly into their designated color-coded slots.

How to Download Drivers via ij.start.canon
Follow these direct steps to retrieve the official software for your machine. (Estimated Time: 5 minutes)
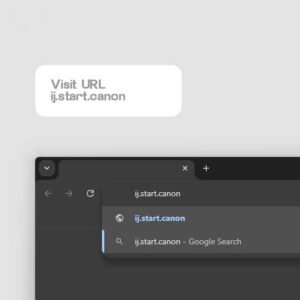
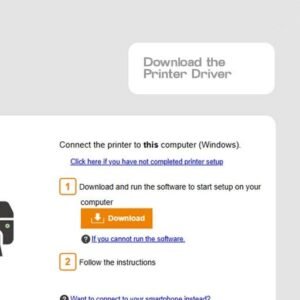
1.Visit the Setup Official Website:
Open your preferred web browser, type ij.start.canon into the URL address bar, and press Enter.
2.Initiate the Setup:
Click on the Button “Set Up (Start Here)”.

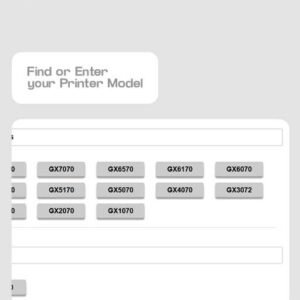
Enter your specific model number (e.g., TR4720) in the search field and click “Go.”
The platform will display the correct software suite for your detected operating system. Click the designated download button to save the file to your computer.
Note: ij.start.canon is the standard portal for configuring Canon hardware, providing step-by-step digital manuals, utility tools, and primary drivers.

Supported Operating Systems
The drivers provided through ij.start.canon are compatible with a wide array of systems:
-
Windows: 11, 10, 8, 7 (32-bit, 64-bit, Intel, AMD, ARM)
-
macOS: MacBook Pro, iMac, Mac mini, Mac Studio
-
Mobile OS: iOS (iPhone, iPad) and Android (Smartphones, Tablets)
-
Other: Chrome OS (Chromebooks) and Major Linux distributions (Ubuntu, Mint)
USB Canon Printer Setup
For a plug-and-play experience on modern Windows and Mac systems, simply connect the printer to your computer using a USB cable. Ensure you are connected to the internet; your OS will usually detect the hardware and pull the basic drivers automatically. If it fails, run the setup file downloaded from IJ Start Canon and choose “USB Connection” when required.
If the auto Connection not working:
- Visit ij.start.canon and Download and Install the Driver.
- Driver Setup will show an on screen step-by-step guide and follow the guideline.
- Turn On the Printer
- Connect your Printer to the USB Cable
- Try To Print a Test Page
Installing the Downloaded Driver
Once your file finishes downloading, it’s time to run the installer.
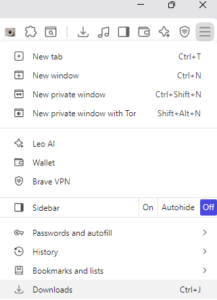
1. Locate the File: Open your computer’s “Downloads” folder, or press Ctrl + J (Windows) / Cmd + J (Mac) in your browser.
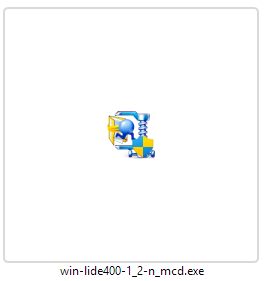
2. Launch the Installer: Double-click the downloaded setup file (usually ending in .exe, .msi, or .dmg).
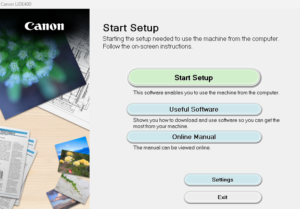
3. Follow the Prompts: Click “Next” or “Start Setup” and follow the on-screen prompts to agree to the license terms and finalize the installation.
Get Started with your Canon Printer Setup, Canon Printer Download with ij.start.canon
Setting up a printer shouldn’t feel like a chore, but let’s be honest—getting the hardware to actually talk to your computer can be a bit of a headache. Your Canon is a powerhouse of a machine, but all those features don’t mean much if you’re stuck at the starting line. If you’re looking to get things moving, you’ll need to knock out the IJ.Start.Canon or IJ Start Canon Setup first. Don’t worry about digging through a dry manual; we’ve distilled the process into a few simple steps to get you printing in minutes.
Wi-Fi/Wireless Canon Printer Setup
Here is a unique, step-by-step rewrite of the instructions for connecting a printer to a wireless network:
Prerequisite: Ensure your printing device is equipped with built-in wireless capabilities before beginning.
Power Everything Up: Turn on both your printer and your home internet router. Verify that your router is actively broadcasting its signal.
Access the Connectivity Menu: * If your printer has a digital display: Navigate through the main menu to find the ‘Network,’ ‘Settings,’ or ‘Connectivity’ section.
If your printer lacks a screen: Press and hold the dedicated Wi-Fi button on the control panel until the indicator begins to flash.
Launch the Setup Wizard: From the network menu on the screen, select ‘Wireless Configuration’ or ‘Network Setup Wizard.’
Choose Your Network: The printer will scan for nearby signals. Scroll through the list and select your home Wi-Fi name (the exact same network you use for your smartphone or computer), and enter your password if prompted.
Confirm the Connection: Wait a few moments for the devices to link. A successful connection is typically confirmed when the blinking Wi-Fi LED light on the printer turns completely solid. (Note: The specific color of the indicator light will vary depending on the manufacturer).